About this time last year, I knit L a hat for his birthday. It was my first hat, and it turned out pretty well. I used the classic Turn a Square pattern by Jared Flood, but L just wanted dark and light grey stripes, and then picked out Abeulita Yarns Mysterious Blend Bulky as his preferred yarn, so I modified the stitch count a little. That yarn is absurdly soft. It’s a merino/corriedale/silk blend, and I distinctly remember saying I wanted to knit with nothing else ever again.

There’s no doubt that this hat has been well worn.
L went on to wear that hat almost exclusively for the next year, and while it remains a favourite, it has gotten quite fuzzy (bulky singles will do that), so in the fall he asked for a new hat. I knit him one for Christmas, which he has happily worn for the last month. On the weekend, though, he asked if it would be possible to lengthen the hat. Horatio, the hat I’d knit him for Christmas, is a sort of watch-cap style hat, and thus a little tighter than Turn a Square. Toronto is cold and we’re outdoor people, and he wanted a hat he could pull pretty much right down to his eyebrows. In the future, I will just lengthen the ribbing (there’s a turn row in the ribbing too, so I couldn’t even pick up stitches there and just lengthen it), but since it was too late to that this time, I made a plan for a calculated rip and reknit.
Should you ever need to do something similar, here’s what I did:
1. Assess what’s needed: Basically what he wanted required an extra repeat of the main pattern (six repeats instead of five). there’s a a plain row between each pattern repeat, so that seemed like a logical place to rip back to. At the top of the fifth repeat, though, that plain row is a decrease row, I decided to rip back to the top of the fourth repeat.
2. Put in a barrier: I didn’t want to risk ripping back too far (or not being able to see where I was ripping back to), so using a smaller needle than the one I knit with (in this case, a 3.5mm circ) I carefully picked up the righthand leg of each stitch in the row I wanted to rip back to. I then carefully unpicked my weaving in and started ripping.


It kind of looks like the hat exploded, doesn’t it?
3. Fix any miscalculations: This is a dark grey hat. A dark grey, variegated hat with a textured pattern. This makes picking up stitches a little tricky. So, after ripping back I realized that, in a few places, my picked-up stitches were one row below where I wanted them to be. I held all the correct stitches on various implements and, as I got to them, simple knit them in pattern and left the lower down stitches stay where they were.
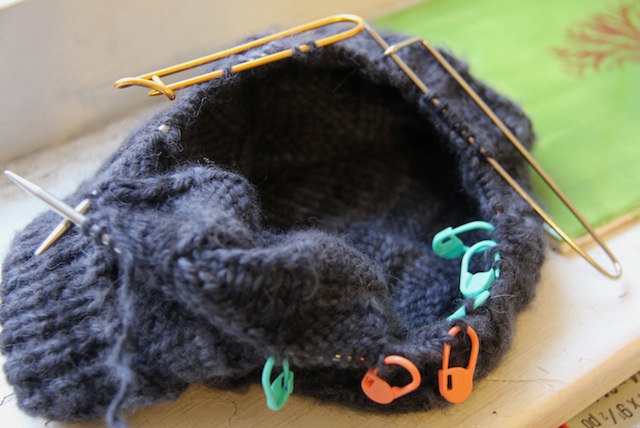
This makes it look worse than it was, but does explain why I opted to rip back to plain row even when that meant re-knitting a whole pattern repeat.
4. Knit to the top: Once I had that first pattern row knit (knitting from the 3.5mm needle onto the 4.5mm needle I needed for the pattern) I knit two repeats of the main pattern and then decreased as I had before. I had plenty of yarn leftover, so when I got tired of using the very crimped frogged yarn, I just cut it and joined in the fresh stuff – you can’t tell at all.

Ta da! I realize I don’t really have a “before” photo, but it looked just like this, only a little shorter. (The earlier photos are a better indication of the colour than this rather muddy one.)
This took only a couple of hours and L is very please with his slightly elongated hat (and I am very pleased the issue wasn’t with the width, which would have required complete re-knitting.) What do you think of my method? Have you ever had to do anything similar?

Thanks for sharing your method! I’ve had to lengthen a sweater but it didn’t occurred to me to create a barrier before ripping back. Good idea!